Meet the "Real" Betty

Meet the "Real" Betty
Betty through the ages

Wednesday, June 3, 2015

Warm From Your Nose Down To Your Toes


I love it when we get to the time of the year when we can open up the windows and the house is full of fresh air.  During the warmer months, our windows are open 24/7, no matter how high or low the temperature gets.  The only down side to this is the nights when the temperature drops into the high forties and you find yourself freezing.  When I find myself cold no matter how many blankets I heap on, I know that it is time for soup.

This evening, as the temperatures dropped to 48°F, I found myself craving a little something to warm my insides so I turned to my collection of soup recipes.  Many of the recipes for soup in my collection requires hours of simmering to prepare them and that just was not something I was interested in tonight.  Tonight, I wanted something relatively quick but I did not want to cut corners on flavor.  I did not have enough vegetables on hand to do a vegetable soup and my Magic Chicken Noodle Soup simply takes too long to make.  Then I found a recipe I had not made in a long, long time:  Peanut Soup.  It is simple, quick and tasty and I just happened to have all of the ingredients I needed on hand.

Peanut Soup is one of those recipes that are so tasty and simple, you have to wonder why you don’t make it all of the time.  The flavors are bold without being over the top, it tastes creamy without containing any cream and you can dress it up and serve it on an elegant table or dress it down and serve it on a basic table.  No matter how you choose to serve it, there is no mistaking that Peanut Soup will keep you warm from your nose all of the way down to your toes!


Peanut Soup
Serves 4

Ingredients
  • 3 cups vegetable broth
  • ½ small onion, diced
  • 1 small zucchini, diced
  • 3 tablespoons tomato paste
  • 4 tablespoons peanut butter
  • 1 – 2 cloves garlic, minced
  • 2 tablespoons soy sauce
  • 1 cup cooked rice
  • Peanuts


Directions
  1. In a medium sauce pan, bring the vegetable broth to a boil.
  2. Add the diced onion and zucchini and allow to simmer for 2 – 3 minutes.
  3. Add the garlic, tomato paste, peanut butter and soy sauce and stir until well combined.
  4. Allow to simmer for 15 – 20 minutes or until vegetables are cooked through, stirring occasionally,
  5. Add cooked rice, stir to combine and allow to simmer for 3 – 5 minutes.
  6. Garnish with peanuts and serve hot.


What kind of soup warms your insides on a cool evening?  Comment below and let me know!

Mmm...Mushrooms


I am not going to lie, I love mushrooms.  I love them raw, I love them cooked, I loved them fresh, I love them canned, I love mushrooms in a box, I love mushrooms with a fox.  I love mushrooms here and there, I love mushrooms everywhere! 

My love of mushrooms began as a child when my parents insisted on ordering mushrooms on pizza.  The passion just grew from there.  I began eating them on salads, as side dishes, as main dishes, raw, cooked…Well, you get the idea.  I love mushrooms and I am willing to eat them any way they are served.

The other day, I was in the mood for stir fry and when I went to my refrigerator to see what I could throw together, there, staring me in the face was two packages of organic mushrooms and a bunch of organic asparagus.  I knew immediately that the only answer to the question of what I was in the mood for was a Mushroom and Asparagus Stir Fry.  I could barely contain my excitement as I got out my rice cooker to get the rice going before I began preparing the sauce and vegetables.

I love Mushroom and Asparagus Stir Fry because it is simple and quick and it makes enough that I can portion out the leftovers and eat them for several days.  In a matter of minutes, I can have the sauce ready to go, the mushrooms cooking and a big pile of asparagus cut into bite size pieces and ready to go in the pan.  My recipe makes four generous portions or six normal size portions that are incredibly filling yet light enough that you will not feel weighed down after a meal.  On the down side, my husband would not touch Mushroom Asparagus Stir Fry with a ten foot pole.  He avoids both vegetables like the plague.  On the up side, that just means that I get to eat it all myself.  (It’s mine!  Mine I say!  All mine! – Insert maniacal laughter here.)


Mushroom Asparagus Stir Fry
Serves 4 – 6

Ingredients
  • 1 pound white button or Baby Bella mushrooms
  • 1 bunch fresh asparagus (about 1 pound)
  • 2 tablespoons toasted sesame oil
  • Optional:  4 – 6 servings cooked rice or quinoa


Sauce Ingredients
  • 1 teaspoon toasted sesame oil
  • 2 tablespoons low-sodium soy sauce
  • ½ cup vegetable broth
  • 3 cloves garlic, minced
  • 1 tablespoon cornstarch or flour


Directions
  1. Thoroughly whisk together all sauce ingredients in a small bowl and set aside.
  2. Cut mushrooms into quarters.
  3. Heat 2 tablespoons of sesame oil in a large skillet over medium-high heat.
  4. Add mushrooms and stir.
  5. While mushrooms are cooking, cut asparagus into bite-size pieces.
  6. Add the asparagus to the mushrooms, stir to combine, cover and allow to cook for about 5 minutes or until asparagus is tender-crisp.
  7. Add the sauce, stir, cover and allow to cook for 3-4 more minutes.
  8. Remove from heat, stir and serve over cooked rice or quinoa, making sure to drizzle the pan sauce over to top of the vegetables.


What is your favorite way to eat mushrooms?  Comment below and let me know!


Tuesday, May 19, 2015

Curry It Up

It has been a while since I have posted a new recipe.  Rest assured that this is not because I have not been cooking.  Rather, circumstances have been such that my husband has been eating a lot of soft foods and I have been fighting seasonal allergies and a bit of a sore throat.  I am sure that we will both be back to 100% soon enough and I will be back to my kitchen experiments as usual. 

In the meantime, I have been stepping out on my beloved garlic and instead have been having an intense affair with curry powder.  Now, before I go any further, let me make it clear that shaking a little curry powder on some food does not a curry make.  Curry and curry powder are two different beasts entirely.  Generally speaking, curry is something akin to a gravy, simmered in Indian spices and true curry pretty much never involves the use of curry powder.  If you want authentic curry, stop by a really good Indian restaurant.  Curry powder, on the other hand, is a combination of ground spices, which usually include coriander, turmeric, cumin, fenugreek, and chili peppers.  Curry powder as we know it was something of a marketing ploy devised by the British in the mid-18th century to sell exotic spice blends. 

Now, back to my love affair with curry powder.  When a much younger version of me purchased my first jar of curry powder, I had no idea what it would taste like.  In all honestly, I was not very fond of the flavors and I could barely choke down the dish I had prepared.  Not wanting to be wasteful, as time went on, I began adding little bits of curry powder to all kinds of dishes – a dash on a sandwich, a pinch on pasta, a little sprinkle on roasted meats.  During this time, a funny thing happened:  I developed a taste for curry powder and I began craving it.  On the occasions that I used it, I began adding it in larger amounts.  Then I began adding curry powder to everything from avocado to zucchini and everything in between. 

In the past week, I have added curry powder to roasted chicken, potatoes and even a salad.  Sometimes I add it all by itself and other times, I combine it with other spices.  I love that with only a small amount of curry powder, I can transform a simple dish into something that tantalizes with exotic scents and flavors. 

Spices are a way of life for me.  In my little kitchen, I have an entire cupboard dedicated to them and on occasion, I like to open the door and breathe in the mingling scents.  I have my favorites and a few I am not so fond of and I love to use them all.  I will always love garlic above all else but I will never feel guilty about stepping out with curry powder.


What are your favorite spice blends?  Comment below and let me know!


Sunday, May 10, 2015

So Fresh Pasta "Sauce"

I was in the mood for pasta the other day but I did not want to just open a can or jar and dump some sauce on it.  When I started looking for sauce recipes, it suddenly seemed that the only recipes out there involved canned ingredients and that just did not sound appetizing to me.  Therefore, I decided to pick up some fresh ingredients and come up with something of my own.

I absolutely love zucchini so that was a must when it came to my pasta.  Additionally, I picked up some organic heirloom cherry tomatoes, onion and garlic, Kalamata olives and a pound of organic, hormone and antibiotic-free, grass fed beef.  I combined all of these with a few dried spices that I had on hand and whipped up a bit of magic in the kitchen.

Making a pasta dish using fresh ingredients takes a considerable amount more time than opening a jar and dumping it in a pan.  Anything fresh takes a lot more time than processed food in a jar.  The flavor and nutritional benefits are definitely worth the extra time.  When you make real food for yourself and your family, you will never be sorry for doing so.  Even your veggie haters will love the flavors in this pasta dish!

"Sauce" is ready to toss with pasta!


So Fresh Pasta “Sauce”
Serves 8

Ingredients
  • 1 pound cherry tomatoes
  • 1 pound ground beef
  • 1 small onion, diced
  • 1 small zucchini diced
  • 4 cloves garlic, minced
  • 3 tablespoons olive oil
  • 1 tablespoon fish sauce or anchovy paste
  • ¼ teaspoon red pepper flakes
  • ¼ teaspoon dried oregano
  • ½ cup diced Kalamata olives
  • 1 tablespoon dried parsley
  • Salt to taste
  • Pepper to taste
  • 16 ounces of your favorite pasta (I used mixed veggie rigatoni)
  • Optional:  Fresh Parmesan cheese to taste


Directions
  1. Combine olive oil, garlic, fish sauce, red pepper flakes and oregano in a small bowl and set aside.
  2. Finely chop tomatoes.  (If you have a food processor, process until finely chopped but not pureed.  If, like me, you do not have a food processor, you can first remove any stems then cut all tomatoes in half.  After that, use kitchen shears to finely chop tomatoes in a bowl.)
  3. Place chopped tomatoes in a sieve or fine mesh strainer and allow liquids to drain into a bowl below.
  4. Using a rubber or wooden spatula, gently press on solids to extract more liquids.
  5. In a large pot, cook pasta until al dente then drain and set aside.
  6. In a 12-inch skillet, brown ground beef.
  7. Add onion and zucchini to beef and cook until onion is slightly translucent.
  8. Add olive oil mixture to beef mixture and cook for 2 – 3 minutes.
  9. Add liquid drained from tomatoes to beef mixture and allow to simmer until liquid is reduced by half.
  10. Add tomato pulp, olives and parsley, mix well and allow to cook for 2 – 3 minutes.
  11. Remove skillet from heat then combine meat mixture and pasta and toss gently to combine.
  12. Serve immediately.

Chopped, unstrained tomatoes.

 
Pressed and liquid strained into bowl below.

Browned beef just after adding onions and zucchini.


What is your favorite way to prepare pasta?  Comment below and let me know!


Monday, May 4, 2015

Mother Clucking Feta Florentine Stuffed Chicken


By now, you all know that I have a chicken obsession so it should come as no surprise that I created a new chicken recipe yesterday.  I combined my love of chicken with my husband’s love of spinach and came up with Mother Clucking Feta Florentine Stuffed Chicken.  All kidding aside, I think I can say that this is easily my husband’s favorite thing I have ever made.  Ever.  EVER!  I cannot even count how many times he told me, “This is so good!” while we were eating dinner. (I served mine with a side of rice and fresh homemade cornbread.)

In our house, we normally only eat two meals on Sundays.  It is not a conscious decision we made.  It is just something that happened all on its own and we have gotten used to it.  For that reason, or Sunday dinner is a bit bigger than most dinners we would consume and we eat it mid-afternoon instead of in the evening.  Because of this, Mother Clucking Feta Florentine Stuffed Chicken works really well for us.  It makes a meal that is filling enough to last through the evening.

I do not often post recipes that require another recipe as an ingredient.  Mother Clucking Feta Florentine Stuffed Chicken is one of the few that does.  If you do not feel like making your own Creamed Spinach to use in this recipe, you can always use the frozen brick variety available at most grocery stores instead.  If you have the time, though, I recommend making it from scratch.  You will not be sorry if you do!

Mother Clucking Feta Florentine Stuffed Chicken was not something that I planned out in advance.  It was getting on to mid-afternoon when I walked into my kitchen and, aside from knowing that I wanted to do something with the chicken I picked up at the grocery store the other day, I did not know what I wanted to make.  I looked in the refrigerator and saw what I had on hand and came up with it then. 

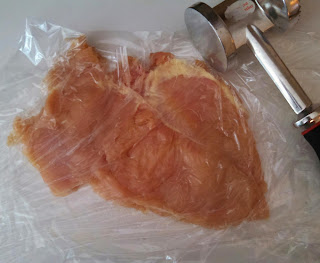
While it might be a little messy to make, it is pretty easy and fun to do so.  –Any meal you can prepare that involves the use of a kitchen mallet is fun!  While I am not a big fan of eating plain feta cheese, I am convinced that some sort of magic occurs when you combine it with spinach.  The resulting combination is a new form of crack and I just cannot seem to get enough of it.


Mother Clucking Feta Florentine Stuffed Chicken
Serves 4

Ingredients
  • 4 chicken breasts –boneless, skinless
  • 1 recipe CreamedSpinach or 3 - 4 serving package of frozen creamed spinach, cooked
  • 2 – 4 ounces crumbled feta cheese
  • Salt to taste
  • Garlic powder to taste


Directions
  1. Preheat oven to 375°F.
  2. Place chicken breasts between two sheets of plastic wrap and pound with the smooth side of a kitchen mallet until chicken is ¼ – inch thick.
  3. Remove top layer of plastic wrap and flip chicken breast so smoothest side is down.
  4. Sprinkle with salt and garlic powder to taste.
  5. Spread one quarter of creamed spinach onto chicken. (No need to spread it completely to the sides.  It will squish to the sides all on its own when you roll it up.)
  6. Sprinkle one quarter of crumbled feta over chicken.
  7. Carefully roll chicken lengthwise, starting at widest end and ending at smallest end.
  8. Transfer to 9 x 13 – inch baking pan, seam side up.
  9. Bake at 375°F for 35 minutes or until chicken is cooked through.
  10. Serve hot.


Have you ever walked into the kitchen without a recipe in mind beforehand?  Comment below and let me know!


Creamed Spinach

My husband, who detests most vegetables, loves spinach.  Therefore, I am always trying to incorporate it into my cooking.  One of my spinach recipes that he really enjoys is Creamed Spinach

I used to always keep a couple of those frozen bricks of processed creamed spinach in the freezer so I could have a handy side dish available to put on the table.  In recent years, though, I have put a lot of effort into learning about processed convenience foods and I found myself feeling let down by the US food industry.  Therefore, I have made an effort to be more conscious about food choices for my family.  Where I would not have batted an eyelash at popping a frozen brick of spinach in the microwave and putting it on the table a few years ago, today I would rather buy organic produce (or grow my own heritage varieties), make a little effort in the kitchen, and put that on the table instead.  By doing this, I can be better informed about what is going into the food that I feed my family.

My recipe for Creamed Spinach is almost sinful, it is so good.  Sometimes I serve it plain as a side, sometimes I top it with a little extra cheese to dress it up just before putting it on the table and sometimes I incorporate it into another dish.  The Creamed Spinach I made today was to be incorporated into Mother Clucking FetaFlorentine Stuffed Chicken

Creamed Spinach
Serves 4

Ingredients
  • 1 ¼ pounds fresh spinach
  • 1 ¼ teaspoons olive oil
  • Salt to taste
  • Pepper to taste
  • Pinch of ground nutmeg
  • Pinch of cayenne pepper
  • 2 teaspoons butter
  • 1 heaping tablespoon minced shallot
  • 1 clove of garlic, minced
  • ¾ cup heavy whipping cream
  • ¾ teaspoon lemon zest
  • 1 tablespoon Parmigiano-Reggiano cheese, finely grated


Directions
  1. Chop spinach
  2. Heat olive oil in a large pot over medium-high heat then add spinach, cover and cook for 2 – 3 minutes or until spinach leaves become wilted.  Stir if needed.
  3. Drain spinach in a strainer then transfer to a plate lined with paper towels. 
  4. Allow spinach to rest until cool enough to handle then squeeze to remove as much excess liquid as possible.
  5. Mix salt and other dry spices in a small bowl and set aside.
  6. Melt butter in a large skillet over medium heat then add shallot and garlic and cook until shallot becomes translucent, stirring often.
  7. Add spice mix and heavy whipping cream and mix well.
  8. Raise heat to medium-high and cook until cream has reduced to about half, stirring occasionally. 
  9. Add lemon zest and stir well.
  10. Reduce heat to low, add spinach and mix well.
  11. Cook for 2 -3 minutes or until spinach is heated through.
  12. Add Parmigiano-Reggiano cheese and mix well.
  13. Serve warm.


What is your favorite spinach recipe?  Comment below and let me know!


Tuesday, April 28, 2015

Be the Change

A mother tends to her daughter, injured in Nepal's recent 
earthquake, at the Tribhuvan University Teaching Hospital
in Kathmandu.                                                unicef.org
Today, I am not going to write about cooking or recipes.  Today, I have something far more pressing than what is going on in my kitchen to talk about.  Today, I am going to write about Nepal and the desperate need for your help.

I want to urge everyone to seek out charities that provide aid internationally in instances of disaster and please make a small donation.  Even if it is only a dollar or two, it helps.  Everything helps.  No amount is too small.

The massive earthquake in Nepal was just the start of the Nepalese people's struggle.  There are areas where 90% of structures have been reduced to rubble. --Homes, gone.  --Businesses, gone.  --Hospitals, gone.  Healthcare there was not a fraction of what we are accustomed to in the US to begin with and since the earthquake, hospitals have been pushed far beyond their limits.  Many are so overloaded, they are being forced to drag mattresses into parking lots to treat the 50,000 - 60,000 patients needing urgent care.  And it is going to get worse without help.

Millions of people are now without basic necessities like food, shelter and clean drinking water.  Medical facilities are running out of supplies as they try to help those in need.  Vaccination programs have had to be set aside while aid workers turn their attention to emergency care.  Without clean water and vaccinations, the Nepalese people will face the possibility of  epidemic outbreaks of diseases like cholera and measles.

An elderly woman receiving medical treatment at the open site 
of a hospital in Kathmandu, Nepal, on April 26, 2015.            
 -- PHOTO: EPA                                    straitstimes.com
Please, please, please help if you can.  Right now is our time to help make the world a better place.  It is so easy to do something so small and help people who are lost, scared and suffering.  We have the power to help.

There are many trustworthy groups to which you can make a donation.  If you aren't sure where to donate, consider one of the groups listed below, all of which are endorsed by Charitynavigator.com.  If you aren't comfortable with making a donation online, please check with your local churches or American Red Cross office.


AmeriCares:  http://www.americares.org/

CARE:  http://www.care.org/

Catholic Relief Services:  http://www.crs.org/

Direct Relief:  http://www.directrelief.org/

Global Giving:  http://www.globalgiving.org/

Oxfam:  http://www.oxfamamerica.org

Save the Children:  http://www.savethechildren.org/

Unicef:  http://www.unicef.org/


Friday, April 24, 2015

I Found My Thrill


I felt like it was time to post a dessert recipe since up to this point, I have only posted recipes for two cakes and two toppings.  This is because I am not a big fan of sweets so I just do not indulge in them very often and, therefore, do not often make them.  When I was at the grocery store last night, though, the blueberries were beautiful and they were calling my name.  I knew immediately that it was time to make Blueberry Hill.

Blueberry Hill is one of those recipes that is so incredibly easy and delicious, you will want to make it all of the time.  It is sweet and creamy and lemony and it is perfect for a special occasion or “just because”.  Make it once and your family will love you.  Make it twice and you may find yourself hiding in the closet so you won’t have to share with anyone else!

Blueberry Hill
Serves 6

Ingredients
  • 18 ounces fresh blueberries
  • 4 ounces cream cheese
  • ¾ cup vanilla Greek yogurt
  • 1 lemon, zested (Save the rest of the lemon to add to your drinking water!)
  • 1 teaspoon honey


Directions
  1. In a medium size mixing bowl, whip cream cheese with an electric mixer until soft and smooth.
  2. Add yogurt, lemon zest and honey to cream cheese and whip until all ingredients are completely incorporated.
  3. Add blueberries and carefully stir until evenly covered.
  4. Serve immediately or store* in an airtight container in the refrigerator.


*Note:  If you choose to store your Blueberry Hill in the refrigerator, the lemon flavor will increase slightly as it sits.


What is your favorite fruit?  Comment below and let me know!

Wednesday, April 22, 2015

Garlic Parm Fingering Potatoes

If you have been following my blog, you, no doubt, have noticed that potatoes frequently make an appearance in my kitchen.  I often attribute my love for potatoes on my Irish ancestry.  The reason they are often in my kitchen, though, it because they are an easy vegetable to prepare.  In a matter of minutes, you can dress them up or dress them down and you end up with a delicious dish that even the pickiest of eaters will love.

Tonight, I wanted the star of the show to be my Island Spiced Chicken so I threw together a simple side of Garlic Parm Fingering Potatoes to pair with it.  These potatoes are wonderfully easy to make.  They toss together in a matter of minutes.  Since they are cooked in a covered dish, they can stand to sit in the oven a little longer than if they were uncovered.  I put mine in and took them out of the oven at the same time as my chicken and they came out perfectly.

Garlic Parm Fingering Potatoes
Serves 4 – 6

Ingredients
  • 1 ½ pounds fingering potatoes (or substitute regular potatoes cut into chunks)
  • 1 teaspoons olive oil
  • 1 clove garlic, minced
  • 2 teaspoons grated Parmesan cheese

Mixed up in minutes and ready for the oven!
Directions
  1. Preheat oven to 325°F.
  2. Clean potatoes and cut larger ones in half.
  3. Drizzle 1 teaspoon of olive oil and toss lightly to coat all potatoes.
  4. Sprinkle minced garlic and Parmesan cheese over potatoes and toss lightly to coat.
  5. Cover and bake at 325°F for 60 minutes or until done.  (If you are cooking other food in your oven at the same time, you can leave these potatoes in for up to 90 minutes without burning them.  Do try to stir them once or twice during cooking time if you do this and remove if they appear to be drying out too much.)


What vegetables are staples in your kitchen?  Comment below and let me know!


Island Spiced Chicken

 Guess what?  It is chicken night again in my house!  Whole chickens were on sale when we went to the grocery store the other day so I picked one up.  At the time, I was not sure what I wanted to do with it but where I live, 99¢ a pound is a pretty good deal so I could not pass it up. 

I thought about the flavors that I was in the mood for and I decided on something with a Jamaican/island-type flavors.  What I came up with was Island Spiced Chicken.  At first, I wanted to add a little rum to the recipe but when I dug through my cupboards the only thing I came up with was a bottle of tequila that had been left at our house by a friend when we lived in Montana about 5 years ago.  It only had about 1/8th of a cup of liquid left in it then and it only had 1/8th of a cup of liquid left in it when I started the recipe.  I used it all and fortunately, it was the exact right amount for my recipe.

Unlike the recipe that I posted the other day, my recipe for Island Spiced Chicken does contain a small amount of salt.  I thought it might be worth mentioning that when I use salt in a recipe, I like to get the most bang for my buck so I generally use seasoning salt.  For a long time, I used a national brand of seasoning salt but a few years ago, I found out that a childhood friend of my husband manufactures and sells his own brand of seasoning salt:  Alden’s Seasonings.  I was very skeptical at first because I had been using the same brand of seasoning salt for my entire life.  I decided to give Alden’s Seasonings a try.  I immediately knew that I had stumbled upon something special – something that my kitchen would never again be without.  The quality and flavors are out of this world and the prices are comparable to what I had been paying for the national brand.  Alden’s Seasonings has multiple blends of seasoning salt but my favorite is the Pink Himalayan blend.  If you are interested in Alden’s Seasonings, contact Alden via his Facebook page for more information on pricing and ordering.


Island Spiced Chicken

Ingredients
  • 1/8 cup tequila
  • 1 tablespoon lime juice
  • ¼ cup brown sugar
  • ¼ teaspoon cayenne pepper
  • ¼ teaspoon ground cloves
  • ½ teaspoon ground cinnamon
  • ½ teaspoon ground ginger
  • 1 teaspoon ground black pepper
  • ½ teaspoon salt
  • ½ teaspoon dried thyme
  • 1 teaspoon garlic powder
  • 1 teaspoon onion powder
  • 1 (3 pound) whole chicken
  • 1 tablespoon olive oil


Directions
  1. Combine tequila, lime juice, brown sugar and all spices in a small bowl and mix well.  (This should be the consistency of loose mud.)
  2. Clean chicken, rinse inside and out with cold water then pat dry with a paper towel and place chicken breast up in a roasting pan or dish.
  3. Separate the skin from the chicken breast, leg and thigh by sliding hand between the skin and meat, being careful not to tear the skin.
  4. Using your hand, spread the spice mixture between the skin and meat.  Use any remaining spice mixture to rub into skin.
  5. Tuck wing tips up and over, behind the back and truss together chicken legs with a bit of kitchen twine.
  6. Cover chicken and allow to marinate in the refrigerator for at least an hour or up to overnight.
  7. Preheat oven to 325°F.
  8. Uncover chicken and drizzle with olive oil.
  9. Place in oven and allow to bake for about 90 minutes, until the juices run clear or until a meat thermometer inserted in the thickest part of the thigh reaches 180°F.
  10. Allow the chicken to rest for 10 minutes before carving.


What is on your table tonight?  Comment below and let me know!